This is a guide to replacing the clutch on a 2013-2014 Ducati Hypermotard 821 or Ducati Hyperstrada 821 to get rid of the tiny, grabby engagement zone that makes it hard to ride.
Originally, when I bought my Hyperstrada, I noticed it was hard to ride, but I put this down to my own inexperience. You can’t figure out a bike until you’ve put 1000 km/ 500 miles on it, I thought. I was wrong.
It turns out that the 2013/2014 Ducati Hyperstrada (and Hypermotard) has a known problem with its clutch. Go search for “Hyperstrada 821 clutch problems” and you’ll find many threads in forums, one of which was helpful in me doing this rebuild.
The problem is that the clutch is very off/on. This means that at every launch, you’re at risk of stalling or doing an accidental burnout or wheelie. It’s very embarrassing. It happened to me a lot, and I felt like I went back to being an amateur.
And even if you don’t stall or do a wheelie, you can only launch slowly. A slow launch? What’s even the point of all that power?
This is a guide to fixing that clutch, making the Hyperstrada or Hypermotard 821 into an actually driveable, awesome, useable machine.
It’s such a huge transformation that it boggles my mind that people would even attempt to use the Hyperstrada 821 or Hypermotard 821 WITHOUT doing the clutch fix.
So if you’re hesitating — don’t. Buy the new clutch pack.
This guide was originally inspired by this helpful guide on Hyperstrada.com, but with a lot of notes, some modifications, and my own photos and experience.
For example, I recommend replacing the whole basket, and using a Ducati wet clutch holding tool to remove the centre nut to remove the basket.
Many thanks to users of that forum for their help — I’d suggest go visit Hyperstrada.com if you have detailed questions, the pros there will help.
Are you obsessed with motorcycles?
Well, I am. That’s why I created this site — as an outlet. I love learning and sharing what others might find useful. If you like what you read here, and you’re a fraction as obsessed as I am, you might like to know when I’ve published more. (Check the latest for an idea of what you’ll see.)
Background — The Grabby Hypermotard and Hyperstrada Clutch
Some users don’t experience the grabby clutch, but the majority seem to do so. It seems to be something that plagues only 2013-2014 Hyperstrada and Hypermotard 821 models.
The phenomenon is quite well-documented on major forums. I definitely have the grabby clutch on my own 2014 Ducati Hyperstrada that I bought used — and almost totally stock.
Luckily, in 2015, Ducati changed the design of the Hypermotard and Hyperstrada 821 clutch by adding a washer (called a “belleville washer”) to the design.
The new, upgraded clutch has a much smoother, normal feeling to it. See the below for diagrams of the 2013 and 2015 clutch designs from the parts manuals.
The Ducati Monster 821 always had an upgraded clutch design — it never suffered from the same problem as the Hypers.
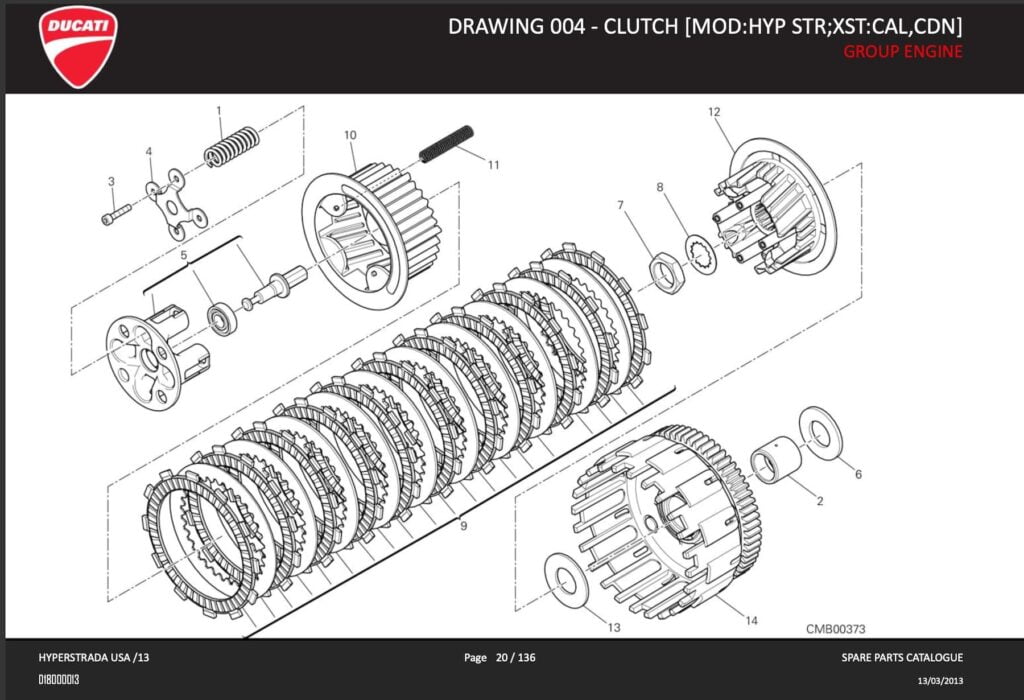
In the standard design, there are 11 driving plates and 10 driven plates between them. There is no anti-judder washer (a “Belleville” washer).
In the updated design from 2015 onward, there is an anti-judder washer that fit inside the outside driving plate, along with a spacer.
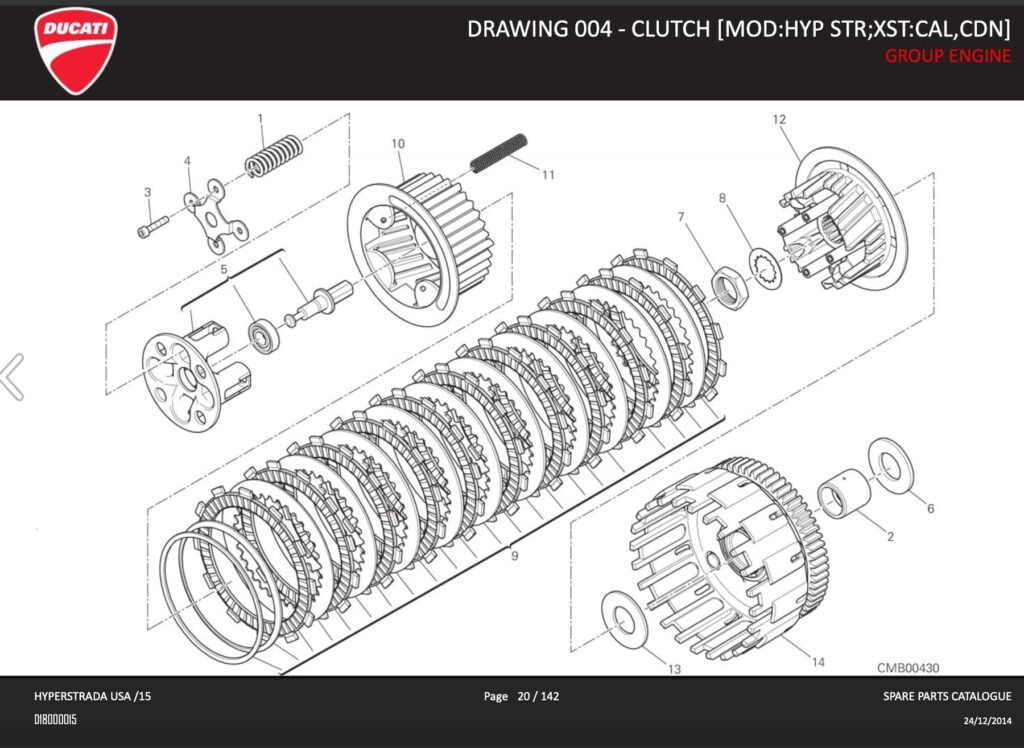
Once you’ve added those washers, the difference between the clutch with it and without it is night and day.
With the modified clutch you can launch quickly and commute effortlessly.
This makes this one of the best bang-for-the-buck modifications for the Ducati Hypermotard or Hyperstrada.
To add this anti-judder washer to your 2013/2014 Ducati Hyper 821 look at the following guide. There are two ways!
Fixing the Hypermotard/Hyperstrada 2013/2014 clutch – Two ways
There are two ways to fix the Hypermotard/Hyperstrada clutch.
Method 1: Replace the whole clutch pack
I personally didn’t follow this method, but I think this is the best way as it’s too hard to come by the washer kit these days.
You can take the clutch pack from the later Hypermotard/Hyperstrada (or Scrambler 800 actually — same clutch pack and part number) and fit it to the earlier Hypermotard/Hyperstrada.
This means that you can fix your 2013/2014 clutch by simply swapping in a 2015 clutch pack (part #19020312A, priced around US$250 on eBay).
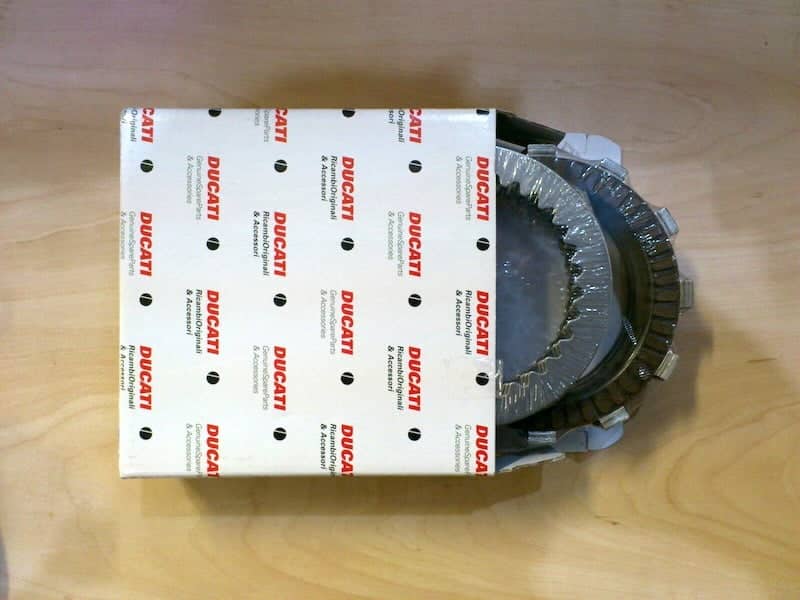
The reason I’d recommend replacing the whole clutch pack is that the whole clutch pack isn’t much more expensive than the anti-judder kit, and the anti-judder kit has very limited availability on eBay these days.
If you really want to save $100 and you can get the anti-judder kit, then by all means do so.
Method 2: Add in a spacer washer (anti-judder kit) to your existing clutch pack
The second way you can fix the 2013/2014 Hypermotard/Hyperstrada clutch is by adding in a washer.
This is cheaper and slightly easier (well, only about 20% easier, as you still have to open up the clutch).
The part you need is a DU 133/6 Anti-judder pack. They’re available for under US$100 on eBay. Unfortunately they’re often out of stock, but you can try your luck.
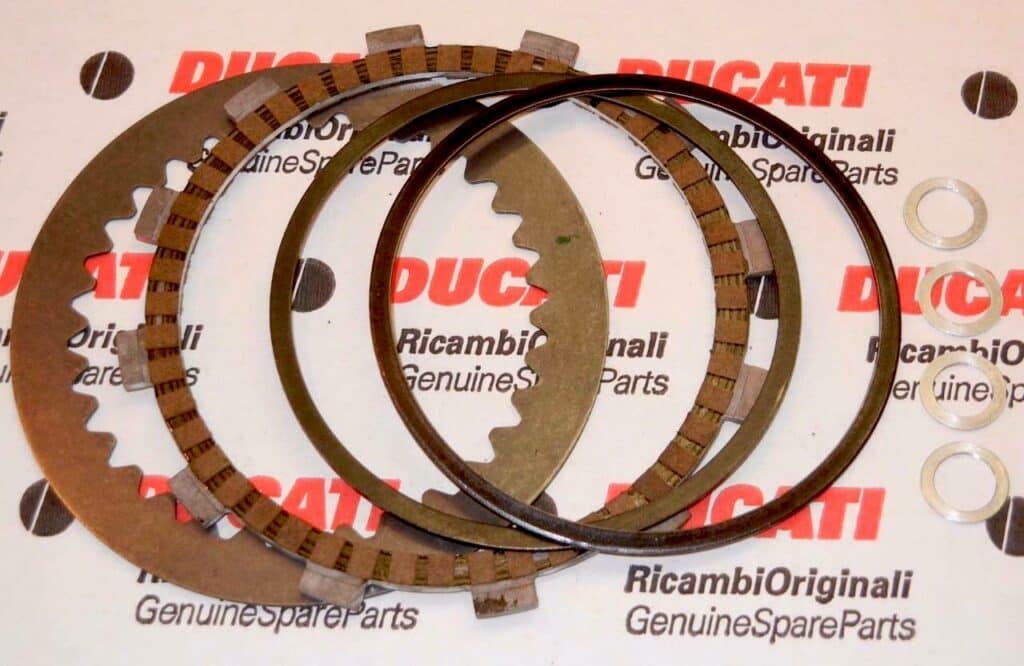
If you don’t need to replace your whole clutch pack, definitely use the anti-judder kit — it’s cheaper and a slightly easier procedure (you skip a few steps that I mention below).
Below see detail for how to perform the swap. It should take you about 4 hours from start to finish, assuming you have a decent work area and all the tools and parts handy.
Tools/parts you’ll need
I’ve included links to eBay & Amazon for your convenience if you don’t have anything of the below tools.
- New 2015 Ducati clutch pack (19020312A) OR anti-judder kit (DU-133/6) (often out of stock)
- Ducati wet clutch holding tool — essential for removing the center nut
- 32mm socket (you might need this separately — doesn’t come in most socket sets!)
- Metric sockets/hex keys (nothing exotic required)
- A large torque wrench capable of measuring up to 150 ft/lb (200 Nm), and a small torque wrench down to 3 ft/lb (4 Nm).
- ThreeBond 1211 gasket sealant or equivalent
- Rubber mallet (to open the clutch cover)
- Breaker/leverage bar (optional, to open the clutch cover, with a woodblock to keep metal bits safe)
- 2 pieces of ~6 inches (~15 centimetres) of 3mm x 0.5 pitch (the normal pitch) threaded rod to hold the plates together. You can buy one piece and cut it in half. You can use a bolt, but you’ll need to cut the head off
- 2 small nuts, and 2 optional wing nuts to fit the threaded rod (ask nicely and they’ll throw them in). Wingnuts make it slightly less fiddly.
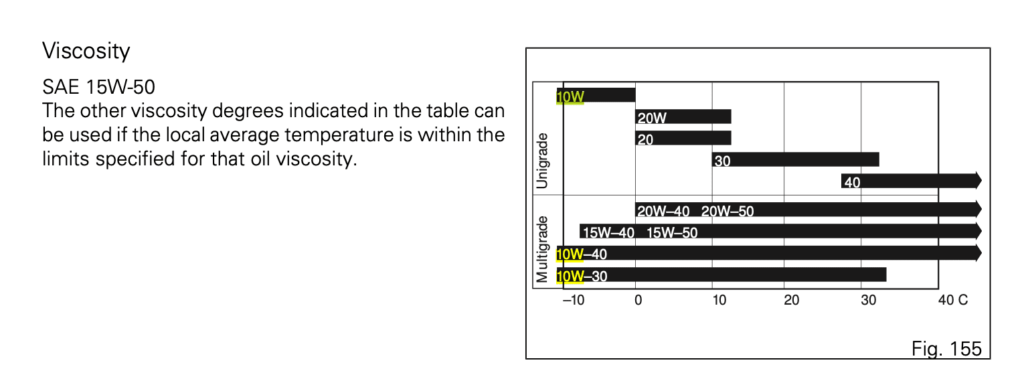
- Engine oil — 15W-50 is the standard spec, but other specs work.
Process (for either method) Part 1: Disassemble the 821 clutch
Below are all the steps you need to replace your clutch and to get one that’s smooth and jerk-free that lets you launch as fast as you want.
I’ve included a lot of steps, because I found that useful when I was trying to follow various guides.
But that said, it’s doable by the kind of person who has a space to work in and a full set of tools.
I’d also recommend a centre stand or a good rear wheel stand to keep it upright. Something about doing work like this with the motorbike leaned over and supported only on its kickstand makes me nervous.
I’ve kept the numbers mostly similar to the guide on Hyperstrada.com so you can compare, although some steps are different as I didn’t do the exact same thing.
1. Clean grit away from the clutch cover.
Get rid of as much grit from around the clutch cover as possible, to avoid grit spilling in when you open the casing.
2. Warm the engine and drain the oil.
Start the bike and run it for a few minutes so the oil heats up a bit (say to 60 degrees C/140 F). This will help it drain.
(The original guide suggested putting the bike in 6th gear at this point, but I don’t recommend that method due to risk.)
3. Disconnect the clutch cable from your clutch lever.
Then, once tension is released, disconnect the cable from the clutch cover. (I found out during this process that this Ducati does not have a hydraulic clutch!)
4. Remove the brake pedal and unbolt the horizontal belt cover
You don’t have to do these, and you can work around it. But I did it, to make it easier to re-install the clutch basket.
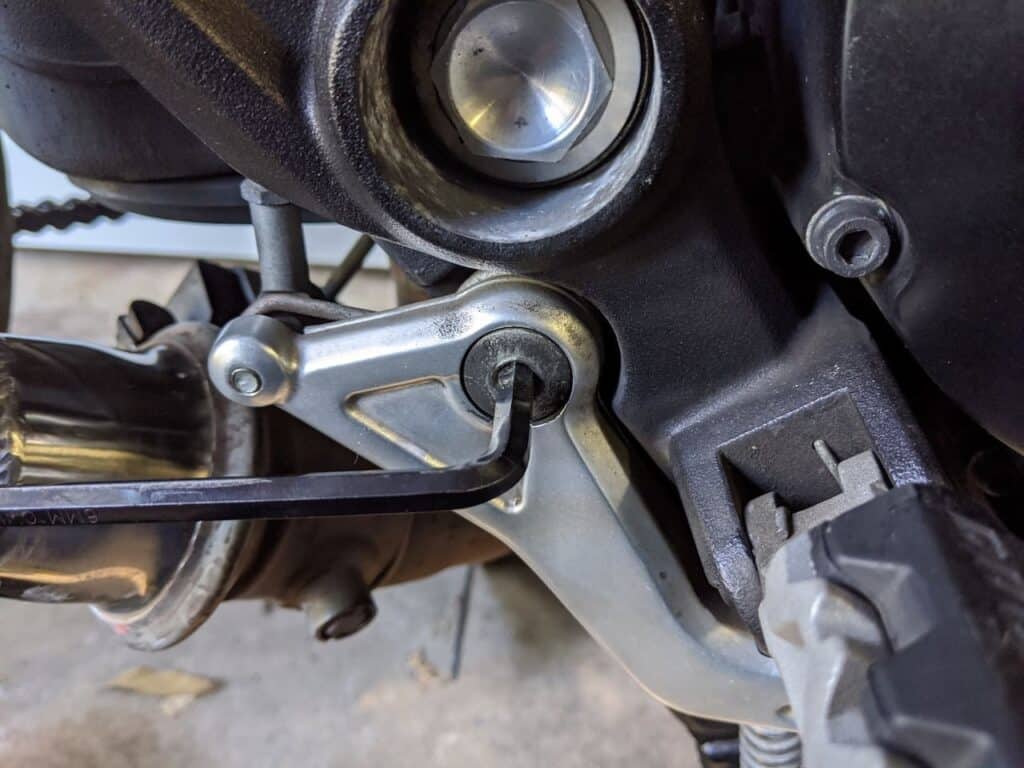
Unscrew line of lower bolts from horizontal belt cover and just the forward bolt from the little joint cover. This gives enough play so you can slide it a bit and get it out of the way to remove the clutch cover.
5. Remove the bolts holding the clutch cover on.
Remove all the bolts, and lay them out on a piece of paper so you remember which is which.
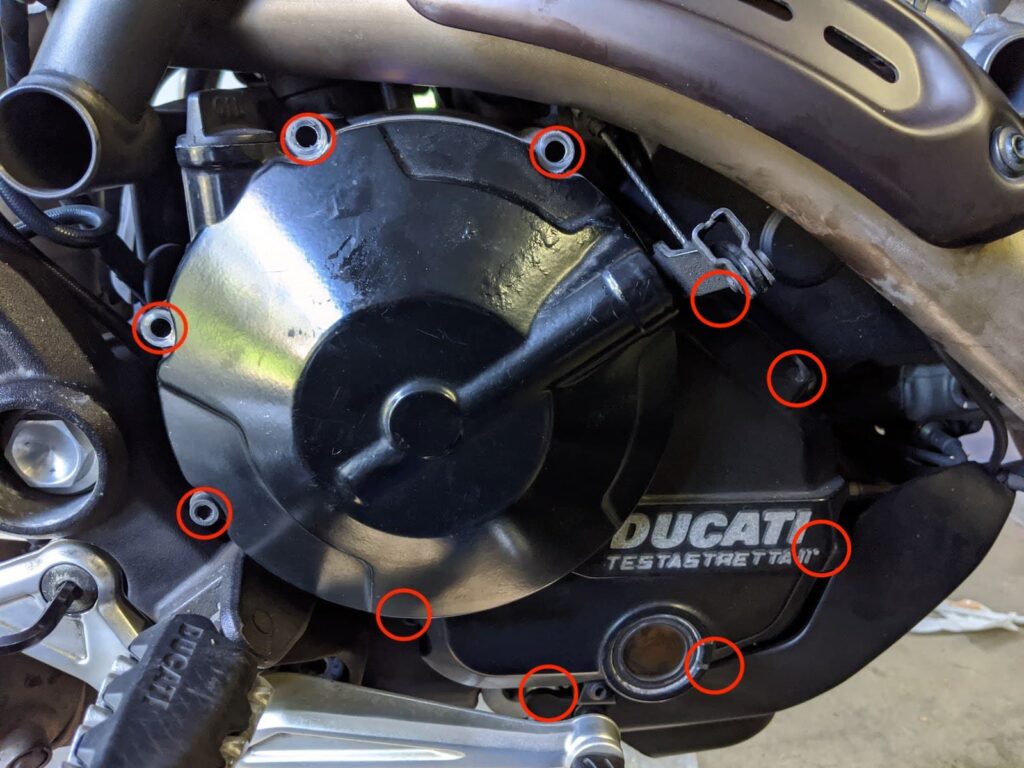
Make sure you go around with a flashlight and remove every bolt. I spent a little while trying to jiggle it off, not realising a couple of bolts remained.
6. Remove the small tab that retains the clutch cable.
There’s a little guide for the clutch cable — remove this.
7. Remove the clutch cover.
You need to use some force to remove the cover, but do NOT try to break the seal by prying it open with a screwdriver.
Start by using the rubber mallet to hit the clutch cover around its outer edge to try to break the seal.
This may or may not work. It didn’t for me and I broke one of the tabs. There are small tabs located on the clutch cover (see photo).
If you want to pry it off, use a pry bar cushioned by a wood block to gently pry the cover off and break the seal.
You can also break the seal with a fine razor.
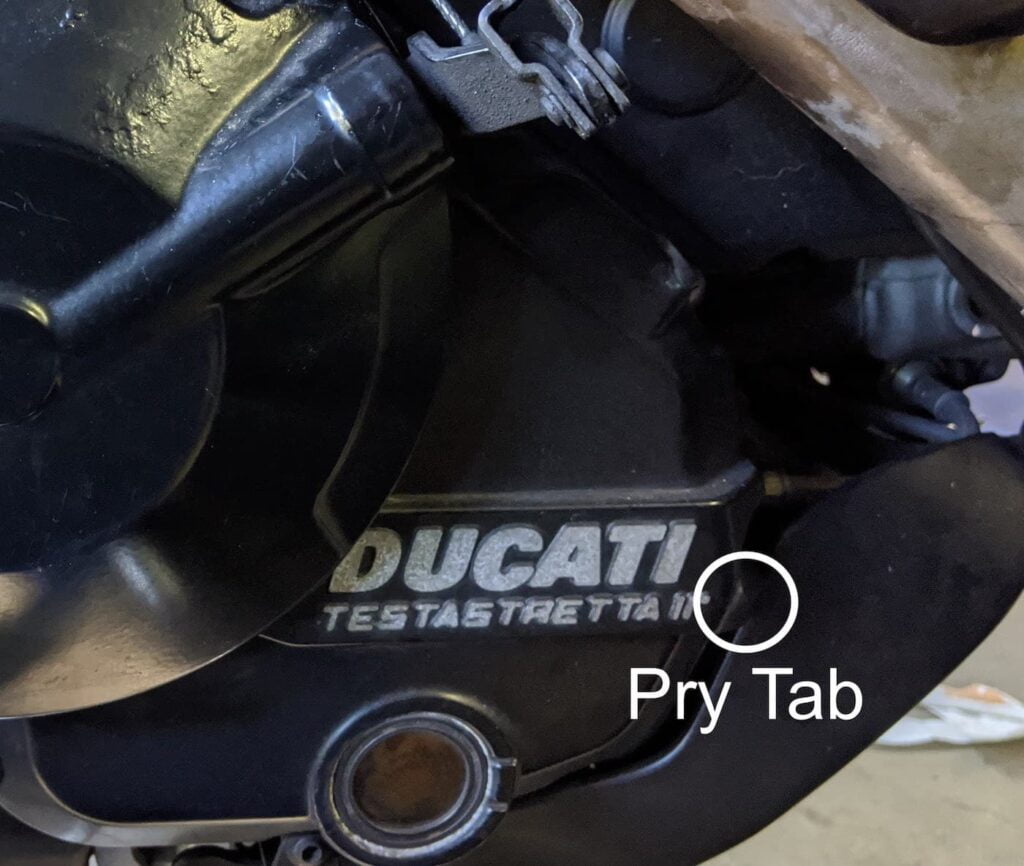
One method you can use is to use a bolt and a nut wedged under a few of the leverage points of the cover.
I used this technique and snapped one of the tabs off — but that’s because I had a bolt left that I hadn’t seen. 🙁
8. Put a tray underneath and wiggle that clutch cover open.
You should now be able to wiggle the clutch cover open. Some drips of oil will come out, so catch those in the tray.
There is a tab that fits behind the belt cover that might get stuck. The brake pedal will also get in the way. Wiggle the clutch cover and it’ll come out gently.
9. WHEN REPLACING WHOLE CLUTCH PACK ONLY: Insert 3mm threaded rods into exposed clutch.
You don’t need to use the 3mm rods just yet if you’re just replacing the two top plates (the anti-judder pack).
Insert the threaded rods as shown in the photo, and finger tighten a small nut nut to hold the clutch pack together. The nuts hold the clutch pack in place.
You need to use a small nut here. You can’t use a wing nut, because it won’t fit through the hole of the pressure plate on top.
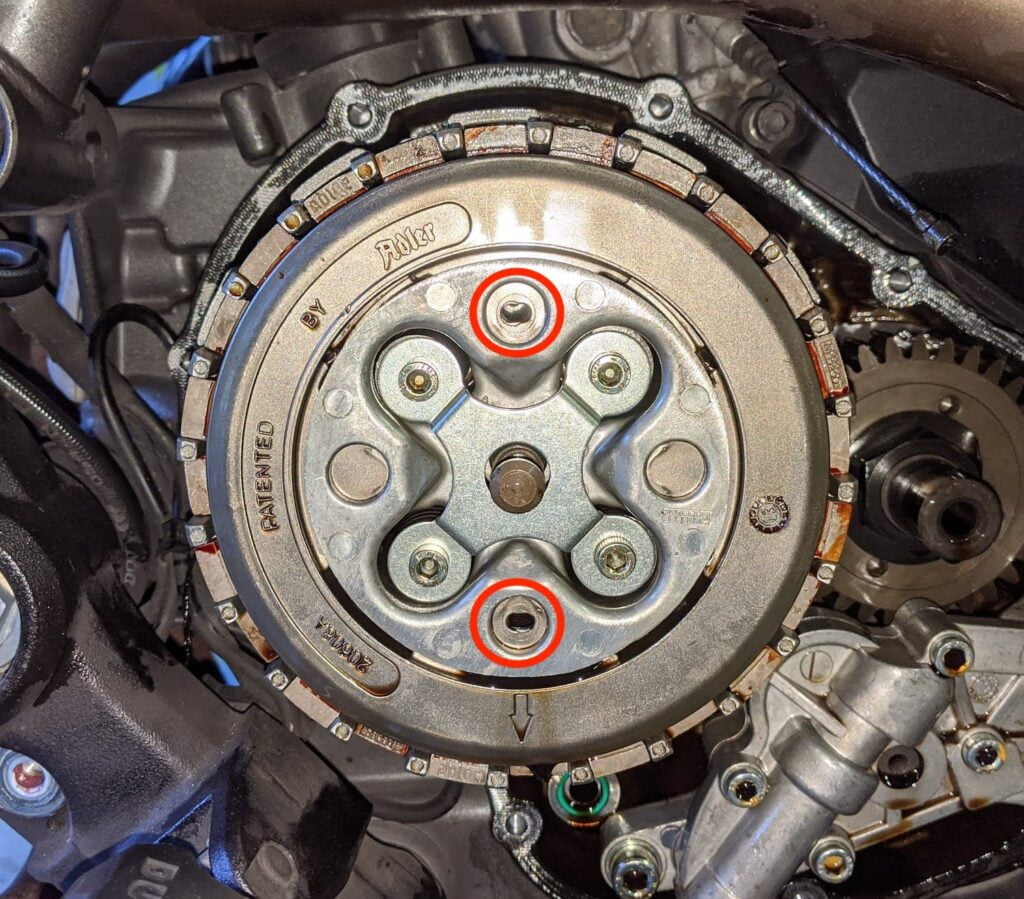
10. Remove the pressure plate (four bolts).
These bolts hold springs down.
Relieve the pressure bit by bit on each one, going gradually around in a circle or in a Z motion.
If you didn’t insert the 3mm rods, your plates will all now come out. That’s why you should release pressure gradually — otherwise there’ll be too much pressure on one bolt.
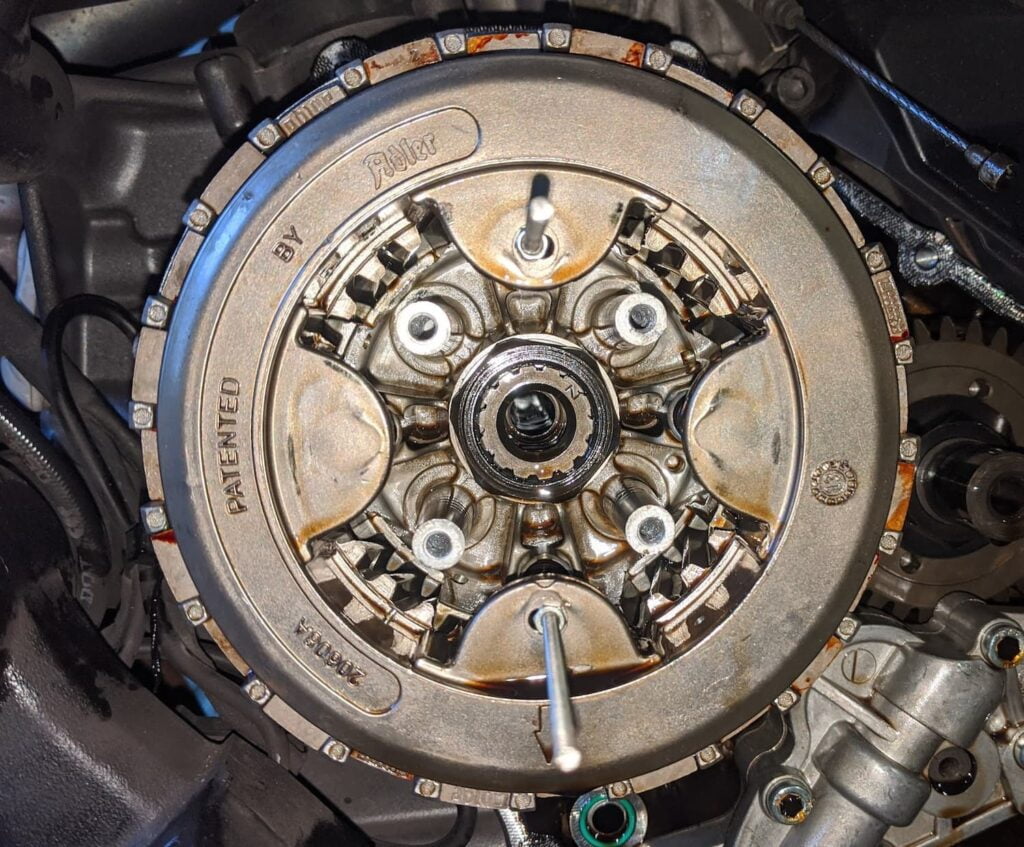
You need to thread the tiny threaded rod into the small holes, remove the clutch springs, remove the needed plates then reinstall it all.
At this point onward you’ve disassembled enough that you can either get out the whole clutch pack, or you can just take out the plates you need.
Part 2: Install your new clutch plates, or replace the clutch pack
If you’re adding the anti-judder kit (and not the whole clutch pack), you can skip steps 11 and 12.
11. WHEN REPLACING WHOLE CLUTCH PACK ONLY: Remove the large central 32mm nut
This is tough. You will need to use a breaker bar and the Ducati wet clutch holding tool to prevent the rear wheel from spinning.
Note: In the guide on the Hyperstrada forum, people suggested putting it into 6th gear and standing on the brake pedal while using a breaker bar, but I found that risky, and don’t mind owning a cheap high-quality Ducati tool.
12. WHEN REPLACING WHOLE CLUTCH PACK ONLY: Slide out the clutch assembly.
The whole pressure plate assembly should now slide out.
Loosen the 3mm nuts on your threaded rod to release the spring tension on the clutch pack.
In standard form, this is what the Hypermotard/Hyperstrada 821 clutch pack looks like.
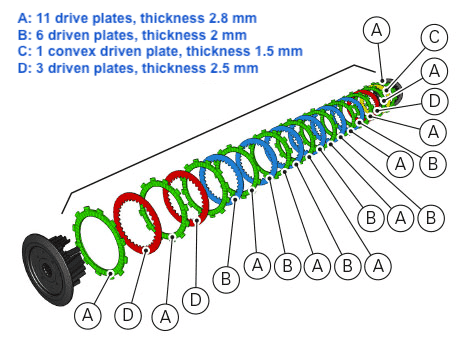
There’s some discussion about whether those plate thicknesses are correct or not, but the important part is that there are 11 drive plates, and 10 driven plates sandwiched between them.
13. Install your new clutch pack (or anti-judder kit)
Now, you either install your new clutch anti-judder kit or the whole replacement clutch pack.
If you’re just installing your kit, you remove the two outermost plates, and replace it with the drive plate and driven plate you received in your kit, with the washers inside.
Don’t omit to remove these two outermost plates! Otherwise you’ll have too much pressure in the clutch pack and on the springs.
Note that, according to the service manual, the belleville washer goes on the outside (further away from the engine), with the small spacer on the inside of that.
Both fit inside the outer driven (friction) plate, which has a larger inner diameter.
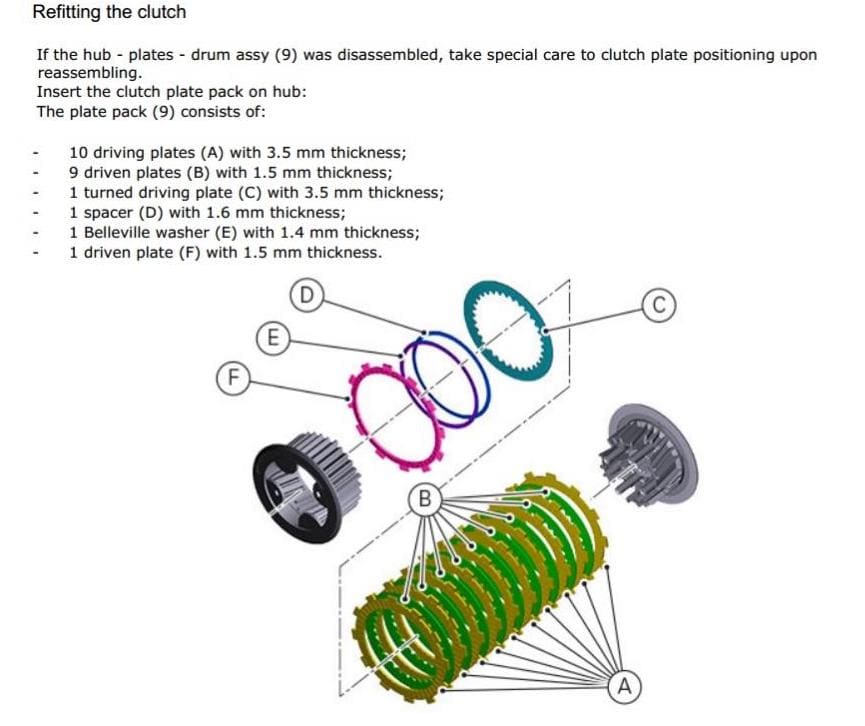
An important consideration is how to fit the judder spacer and spring in the modified clutch pack.
As you can see from the manual above, the clutch sandwich is in this order:
- Front of clutch body
- Driving plate (with friction, a.k.a. friction plates)
- Belleville washer (on inside of driven plate)
- Spacer (on inside of driven plate)
- Driven plate (with teeth)
- Clutch pack — 10 driving plates, with 9 driven plates between them
The total of the above is still 11 driving plates with 10 driven plates. Don’t add extra plates or you’ll bork your clutch!
For orientation of the judder spacer and spring, you can add the judder spring any way around and it’ll work. But the service manual suggests having the thinner part of the belleville washer closer to the front of the clutch. Most other clutch packs have the thinner part closer to the pack.
Second point of caution: offset the last clutch plate you install.
The last clutch plate (outermost), whether it’s from the new clutch pack or from your anti-judder kit, has to be offset.
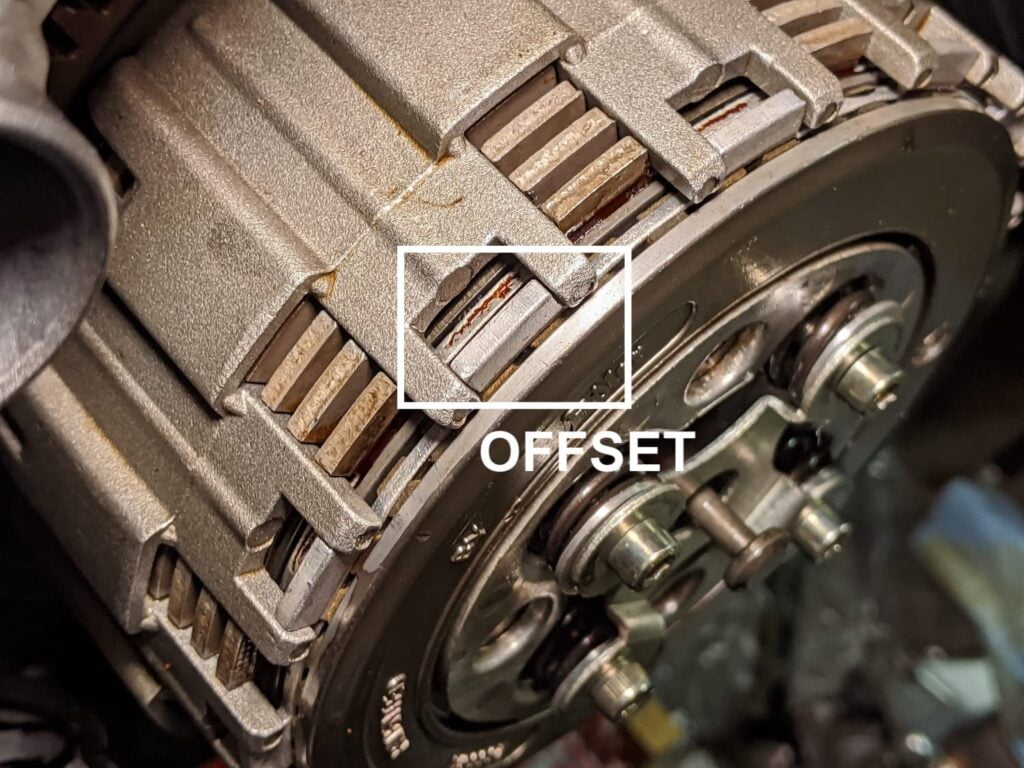
When disassembling the clutch for the first time you may have noticed an alignment marker on the casing of the clutch and on the outermost plate. Make sure those are lined up.
How to re-assemble the clutch
Basically, re-assembly and re-installation is the reverse of what you did above.
14. Re-compress the clutch pack.
Use the 3mm threaded rod to re-compress the clutch pack.
If you removed the whole clutch pack (to replace it with the updated one) you can now slide it back into the bike.
If you just replaced the outermost plates, you are just using the 3mm rod to compress down the pack (to the point where it’s easy to re-install the springs).
15. (If you removed the whole pack) Tighten the 32mm nut to 140 ft-lbs (200 Nm) (original guide had an error).
Stand on the rear brake for this to get enough leverage.
16. Re-install the clutch springs (with washers) and pressure plate.
Put the washers under the clutch springs.
Tighten the 4 bolts to 5 Nm (spec is 4.5-5.5 Nm). Use a torque wrench as this may be tighter than you think.
Don’t torque the clutch pack retainer screws too tightly or they will snap.
17. Remove the 3mm threaded rod.
You no longer need it to keep pressure down.
(step 18 skipped)
19. Clean both mating surfaces (clutch cover and crank case).
Remove any old gasket compound, and de-grease with acetone or brake parts cleaner. Don’t use acid or oil-based cleaners, and don’t scrape with anything other than a fine razor blade.
Inspect the exposed clutch cavity to make sure it’s clean (no dust, dirt, metal debris etc.)
20. Practice re-fitting the clutch cover before putting sealing compound on.
Practice reinstalling before applying silicone gasket.
The clutch cover is a tight fit. Figure out your technique before you have everything covered in silicone.
You have to angle-and-twist to get the cover back on.
21. Apply an even bead of ThreeBond (or other silicone gasket) around the entire mating surface of the clutch cover.
Make sure your go all the way around the bolt holes — make small circles.
22. Refit the clutch cover.
Tighten the bolts to 13.5 Nm or 10 ft-lb.
There should be an even amount of silicone gasket around the entire circumference of the clutch cover.
23. Re-install the clutch cable and the clutch cable guide.
Make sure the clutch still functions.
You may need to adjust your cable slightly at this point. If you can’t find neutral, find the adjuster near your knee on the right side of the motorcycle. Pull the sleeve towards the front of the bike, and use a 10mm wrench to open the nut. That nut locks the adjuster into place. After you’ve opened it, you can adjust the adjuster by hand until you can find neutral easily.
Set the lever adjuster in the middle of its range, use the side adjuster to get close to the right free play, and then fine-tune at the lever.
24. Re-install the rear brake lever.
I didn’t take photos of how this went together with the spring, assuming I could figure it out… haha.
25. Wait for 24 hours for the Threebond (or silicone gasket) to cure.
You don’t actually have to wait with some gaskets, but wait if you want to really be sure.
26. Refill with oil.
Start the bike, check the oil level, and make sure there are no oil leaks.
You’re now good to go.
Confirm clutch operation at low speed.
Troubleshooting
See the bits below. These were hard for me, so I’d recommend you review them to avoid pain.
The hardest parts of this procedure were, for me
- Removing the clutch cover. The damn thing had so many other bits in the way. It took a lot of wiggling to get it out.
- Re-fitting the clutch cover. Quite stressful, given that there’s silicone sealant to worry about. I left it to the following morning. Do the practice runs! Dripping oil afterwards = sad face.
- Clunking sound when turning the engine over. You may have fitted either the offset clutch plate incorrectly, or put too many plates. This hasn’t happened to me, but it has happened to some!
If in doubt of course, contact your nearest Ducati-trained technicians.


Good day folks. I’ve just read your article on the Ducati Hypermotard 821 grabby clutch. I have this problem at the moment. I’ve contacted Ducati South Africa asking for a price on the anti-judder kit DU-133/6 & I’m told this is not a Ducati part??
Any advice would be appreciated.
Hi there, sorry about your issues!! I’ve been there. It’s not a Ducati part, it’s available by the eBay link I provided in the article BUT they don’t always have it in stock.
The alternative, as mentioned, is to install a full clutch pack from a newer 2015+ Hypermotard 821 which includes the anti-judder spring. THAT is a Ducati part and should be obtainable even if there’s a shipping delay.
Fantastic guide – thanks for compiling. I am about to upgrade the clutch on my 2014 Hyper SP with your guide. I have one area of confusion. I was unable to purchase the small anti-judder kit as described in the photos so I purchased just the Belleville washer and spacer as shown in the 2015 clutch diagram from Ducati. According to Ducati, the clutch pack is the same part number for both years, less the addition of the washer/spacer for the 2015 which have additional part numbers. Based on what I am reading from the Ducati service manual and your guide can I simply just add in the washer and spacer to the existing clutch pack or is there a difference? You wrote: “If you’re just installing your (anti-judder) kit, you remove the two outermost plates, and replace it with the drive plate and driven plate you received in your kit, with the washers inside.” Are these plates from that kit different than the already included plates from the stock clutch pack? Thanks again!
Hi! I’m interested how this turned out. Did it fix your grabby clutch? Thanks!
It totally did. The transformation was from grabby to “omg this is now a normal motorcycle”. It took some time to re-adjust.
Can you answer this question?
I don’t know the answer — sorry. I haven’t seen the new stock clutch pack. The advice I got when considering this was to replace the whole clutch pack.
Honestly once you’re at that point, since you can only buy the entire clutch pack, you can TRY to install just the outermost plates and the anti-judder ring. It might work. If it did, then great! (and I’d love to know if you ever remember to follow up).
Is the clutch control pin suppose to move, not sure if i put everything back together right.
hello I don’t know if you will reply to this old post but I try ….. I disassembled the clutch as it is written in your guide. I had a lot of problems with the assembly, however, following the manual.
In fact, in all the photos of the ducati manual the support that pushes the springs where you add the washers is mounted with the “hump” facing the clutch cover while in your photos YOU reassemble the support with the hump facing the plate and this helps you to close the clutch. Do you know if this is a trick to use? do I have to do and so? Thanks
I followed this guide and it was so incredibly helpful! Thank you!
The thing that was a little different for me was that the 19020312A clutch pack that I received, still sealed from the factory, came with steel plates that were all the same thickness, i.e. there was no plate that was 3.5mm thick, they were all ~1.5. (“C” under step #13.) No big deal, though, it all went back together and now the clutch feels absolutely perfect. Night and Day difference!