This article is a general FAQ on everything you may need to know about motorcycle forks. Every bike is different, but I’ll try to cover a lot of bases in this FAQ.
I recently bought a motorcycle that needed new fork seals (discovered thanks to my trusty inspection checklist). And given its history (and that it’s a little bouncy), I was 100% sure it needs new fork oil, too.
Changing fork seals and oil is something my bikes have rarely needed — since the first one (decades ago) when I was too green to understand what any of it meant.
To be honest, I was always a little scared of motorcycle suspension. Every time I try something new on a motorcycle there’s a little fear I won’t get it back together and I’ll have to call in a pro.
So this time I decided to learn everything I needed to know about motorcycle forks and attack the problem with confidence.
You may also be interested in our motorcycle braking systems faq.
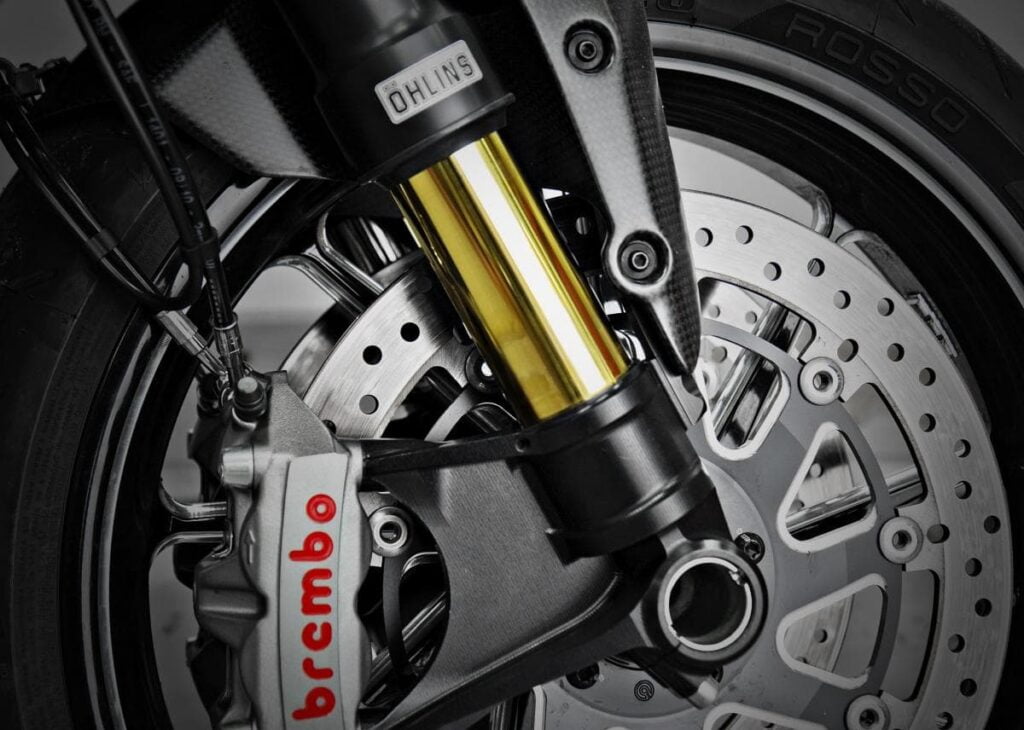
But that doesn’t change the fact that motorcycle manuals recommend changing fork fluid more often than most people do. Definitely more often than “never”. Manuals usually recommend every 30-40,000 kilometres, with some (like Ducati) giving a time period, too.
So here’s everything I’ve learned about motorcycle forks, fork oil, and what can go wrong with the front suspension of a motorcycle, written down in simple terms so I can explain it to myself and others.
One really important thing about changing fork oil is that we’ll have to keep doing it in an era of electric motorcycles. Just like maintaining the chain (or shaft or belt), brakes, tyres, and controls. There’s a lot to motorcycle maintenance that is never going away!
And aside from maintenance, upgrading motorcycle forks is top-of-mind for people who want to get more performance out of their motorcycles. So I often see words bandied about like “cartridges”, “gold valves” and so on. I’ve included that here too. Enjoy!
Are you obsessed with motorcycles?
Well, I am. That’s why I created this site — as an outlet. I love learning and sharing what others might find useful. If you like what you read here, and you’re a fraction as obsessed as I am, you might like to know when I’ve published more. (Check the latest for an idea of what you’ll see.)
What does a motorcycle fork do?
I mean, before we get to this, let’s make sure we know what a fork is! We all start from somewhere…
The “fork” is the suspension at the front of a motorcycle. In nearly every motorcycle available today, the front wheel is held on by an axle that’s connected to the fork. It’s called a fork because it has two prongs that go around each side of the wheel.
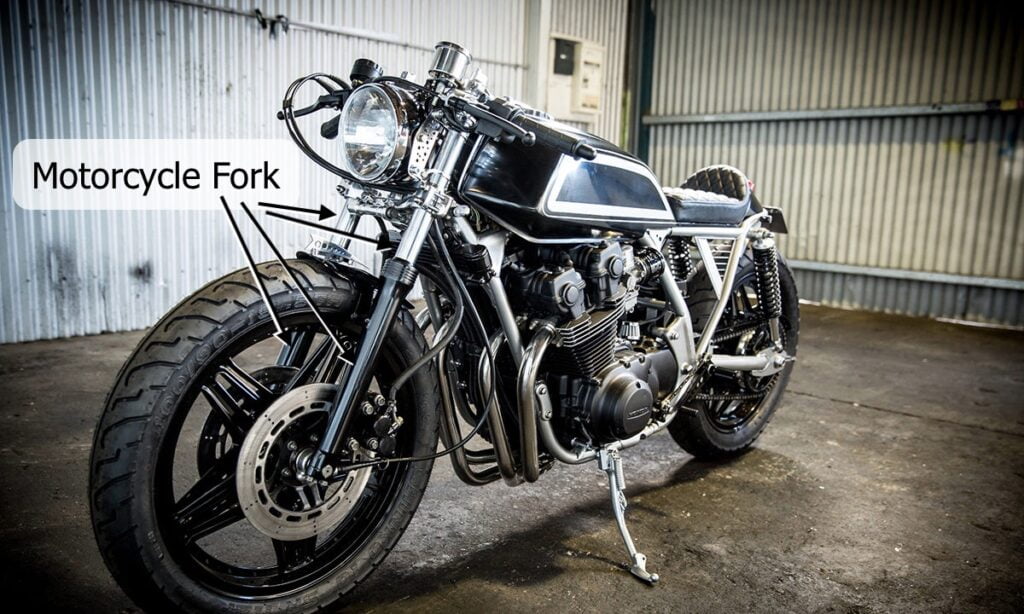
Between the axle and the rest of the motorcycle is the fork suspension (which is what most people are talking about when they say the “forks”), which is essentially two big pistons filled with springs, oil, and other stuff to make it work.
But why even have suspension? Many people think that the point of suspension is to keep a rider comfortable. That’s one purpose. But the other, very important (probably more important) purpose is to maximise traction — to keep the tyre in contact with the road under varying conditions (bumps, acceleration, braking, cornering).
If you keep the second purpose in mind — keeping the tyre in contact with the road — a lot of motorcycle and car suspension design starts to make more sense. In fact, passenger comfort just becomes an incidental (and necessary) side-effect.
What types of motorcycle forks are there?
There are two principal types of motorcycle forks:
- Conventional motorcycle forks, with the fork tube at the top and the sleeve at the bottom, and
- Upside-down motorcycle forks (sometimes written as USD forks… no, that doesn’t mean you have to pay for it in US Dollars!) with the fork tube at the bottom, and its sleeve at the top
Upside-down forks started to be used a lot in the early 2000s. Early sport bikes were the first to get them. These days, many motorcycles have them, even big cruisers like the M109R; though most old-fashioned (or “retro”) motorcycles still have conventional, “right side up” forks.
BMW has been doing interesting things with suspension for decades now, and you might see words like “Telelever” and “Duolever” in their marketing for some of their popular models. That’s a whole other topic.
See more about how Telelever, Duolever, and EVO Telelever work here.
Conventional Forks vs Upside-Down Forks — What’s the Difference?
The main difference between conventional motorcycle forks and upside-down forks is in “unsprung mass”. The unsprung mass is the word used to describe the weight of everything under the suspension spring — i.e. the wheels, brakes, tyres, and the bottom half of the suspension fork.
The reason you want to minimise unsprung mass is that the lower the unsprung mass, the faster your suspension can react to changes in road or traction conditions.
See here for a deep dive into unsprung mass — what it is, how to reduce it, and why.
This means that if you go over bumps, or brake suddenly, or change directions suddenly, the suspension can adapt to the changes more quickly if everything under the suspension weighs less. It’s the same reason they say that fast-running animals have tiny thin legs — so they can move them quickly.

This is also the reason why race vehicles get lightweight wheels (like the Marchesini wheels on my Ducati 1098S). Less unsprung mass.
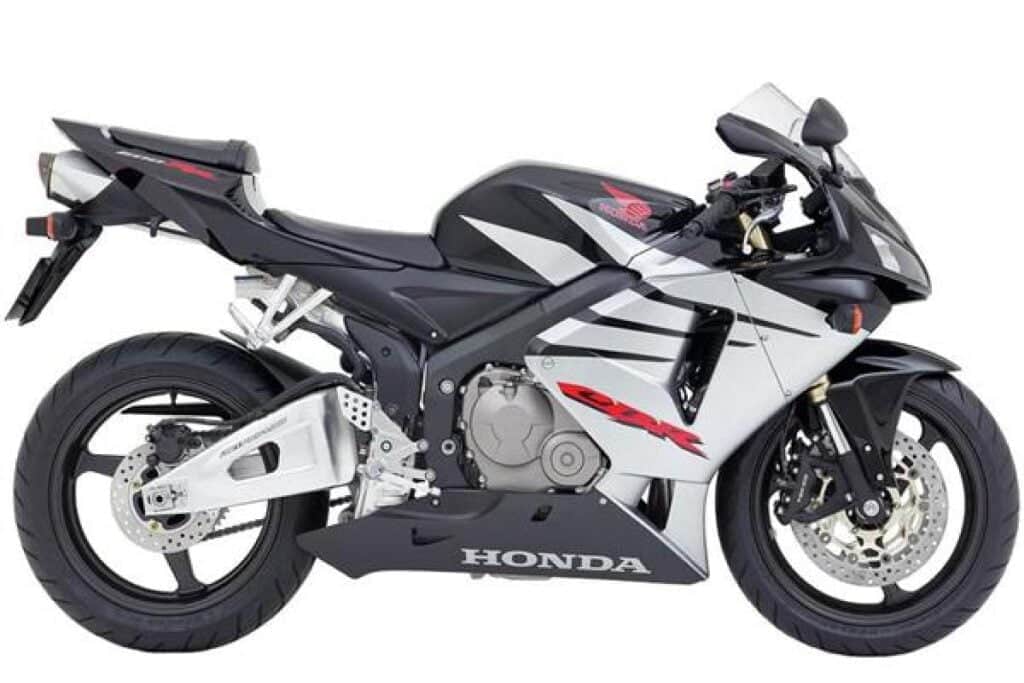
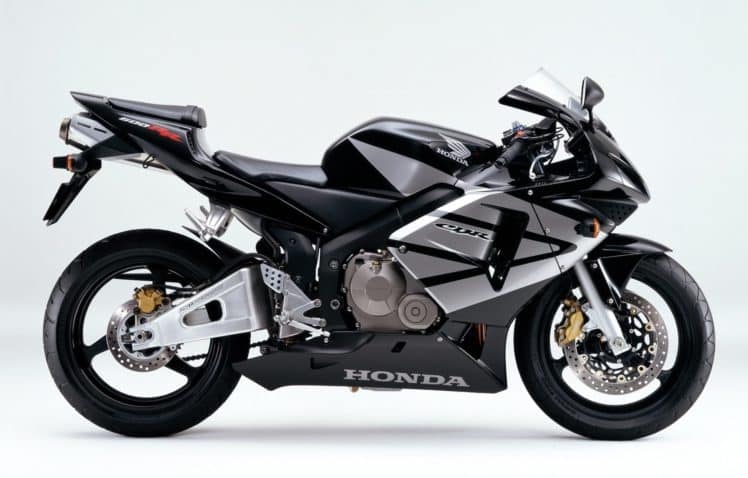
“But the difference must be marginal!” you cry, looking at two generations of CBR600RR side-by-side. The below pics are of a more recent CBR600RR on the left, with USD forks, and an original model on the right, with right-side-up conventional forks.
The difference in suspension responsiveness of upside-down vs conventional motorcycle forks may indeed be minimal unless you’re really sensitive and/or pushing it — but it’s there nonetheless, in at least a pure physics sense.
Another advantage of upside-down motorcycle forks is in strength. I’ve read varying accounts of this, but the most convincing one is this: when you’re braking, the wheel pushes backwards and the motorcycle has inertia pushing it forward. The motorcycle is much heavier than the wheel. It makes sense to have the strongest joints (i.e. those on the bits the fork tube goes into) connected to the motorcycle.
The disadvantage of upside-down motorcycle forks is that a) they’re trickier to service and often have more internal complexity, not all of which is user-serviceable, and b) if you blow a seal (as I have done), oil can leak out onto your brakes, your wheel, and the road, which are all bad news.
What does motorcycle fork oil do?
The job of motorcycle fork oil is to make the motorcycle stop bouncing around after the spring compresses and then rebounds.
Fork oil (and the internals of the fork) plays the role of the shock absorber in a car. It’s just that in a motorcycle, the spring and shock are usually built into one unit.
The most important part of the suspension is the spring. When you go over bumps or potholes, or when you accelerate and decelerate, the wheel moves up and down by compressing or extending the spring.
The problem is that the spring retains a lot of energy. After the bump, if there was nothing to stop it, it would keep bouncing up and down. You might have experienced this if you’ve ever ridden in (or just seen) an old car with a blown shock absorber.
So the oil absorbs that energy and “damps” the bouncing. In the simplest motorcycles, it does this by being squeezed through a tiny hole.
- Spring compresses — oil gets squeezed through tiny hole
- Spring extends — oil gets sucked through tiny hole
It’s hard to squeeze oil through a hole, so that absorbs energy and forces the spring to stop bouncing around.
How and where the oil is used to damp a motorcycle fork spring depends on whether you have damping rod forks or cartridge forks.
What are damping rod forks and cartridge forks? And “Emulators”?
There are two main kinds of forks used in modern motorcycles — damping rod forks (old, simple) and cartridge forks (newer, more complex).
By the way, this is independent of whether they’re conventional or inverted forks. You can have conventional motorcycle forks that are damping rod or cartridge forks, and you can have inverted forks that are damping rod or cartridge.
Damping rod motorcycle forks
Damping rod forks are the most basic form of motorcycle fork suspension: a spring with oil to damp the recoil.
Damping rods are still used today in motorcycles. You may have heard that a motorcycle has “basic” suspension. This is true of most cheap bikes, like a Ninja 400 or an SV650. It’s also true of some surprisingly expensive bikes, such as some of the latest basic BMW R NineT models like the Pure or the Urban GS. It’s kind of crazy that such an expensive bike can have basic suspension.
Let me explain why damping rod motorcycle suspension is considered basic.
In a damping rod fork, the damping action comes from oil being pushed through a set of small holes. When you go over a bump, the fork gets compressed, and a piston forces oil through a hole.
This sounds fine, except that this simple form of damping only has a very narrow band of effective operation. When the suspension moves too slowly or too quickly damping rod forks are much less effective.
The problem with damping rod motorcycle forks is that they can be soft and underdamped during low-speed movement (like when braking) and suddenly turn harsh over quick changes (like small bumps).
The reason damping rod forks can be both too soft and too harsh is that the oil being forced through a small hole gives resistance proportional to the square of velocity. When the oil moves slowly, there’s little to no resistance; but when the oil moves very quickly, the resistance is much higher. So damping rod forks are only effective when the bumps cause the suspension to move in just the right way.
You are most likely to experience the limits of damping rod forks when
- You brake harder than usual coming up to a stop light or when you see an obstacle. The front of your bike gently dives, and you may even bottom out.
- You go harder than average into corners, e.g. when pushing the bike hard. You’ll experience “dive” and/or instability in the front suspension as you brake into the corner and accelerate out.
- You ride over an uneven or corrugated road. Your teeth are now chattering!
You can avoid most of the above, of course, by riding sedately and on good roads. This is why a normal test ride doesn’t expose the limits of simple suspension.
The solution this chaos is to use some kind of valve to change the rate of flow of oil to even it out a little, so damping is more constant. This is the goal of cartridge forks.
Cartridge motorcycle forks
Cartridge forks are the technology that superseded traditional damping rod forks in modern sports motorcycles. And this happened a long time ago — my ageing 2001 CBR600F4i has cartridge forks, for example. (But a modern 2020 Suzuki SV650 still has damping rod forks — which is why a suspension upgrade should be first on your list if you plan on pushing it.)
The goal of cartridge forks is to make damping more linear, proportional to velocity rather than the square of velocity.
Cartridge motorcycle fork legs carry a small cylinder that is, basically, a little shock absorber. This little cylinder inside the leg is the “cartridge”. It sits in the fork oil. A piston slides through the cartridge and performs the damping effect.
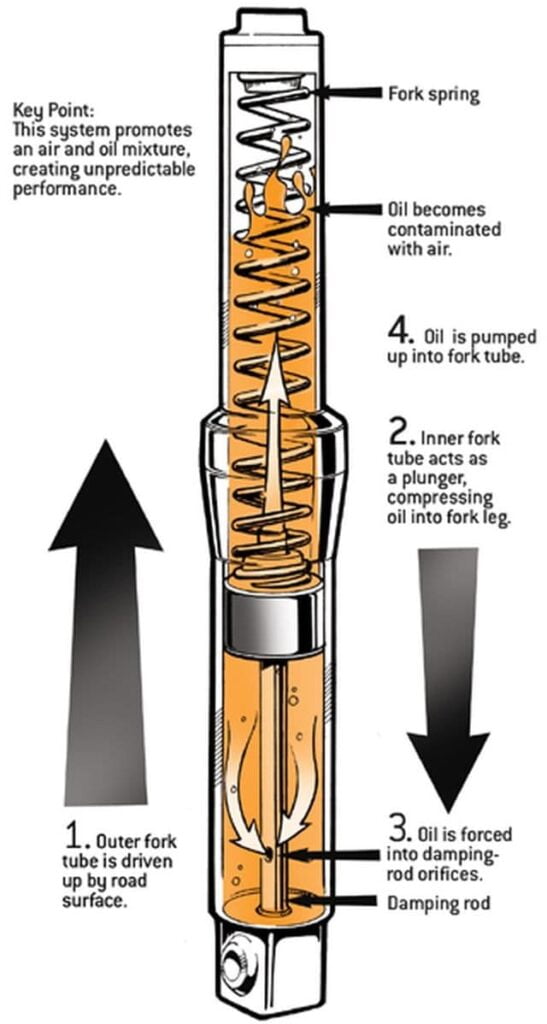

What makes the damping of a cartridge fork more linear is a two stacks of spring-loaded shims (which look like washers) on each piston on each end of the cartridge. These spring-loaded shims work like a valve. When oil flows through the piston, it forces the shims to deflect away from the piston face.
- When the fork compresses (when braking or hitting a bump), oil forces apart the spring-loaded valve on one side. This side gives compression damping.
- When the fork expands (on rebound), the fork expands, and oil forces apart the spring-loaded valve on the other side. This gives rebound damping.
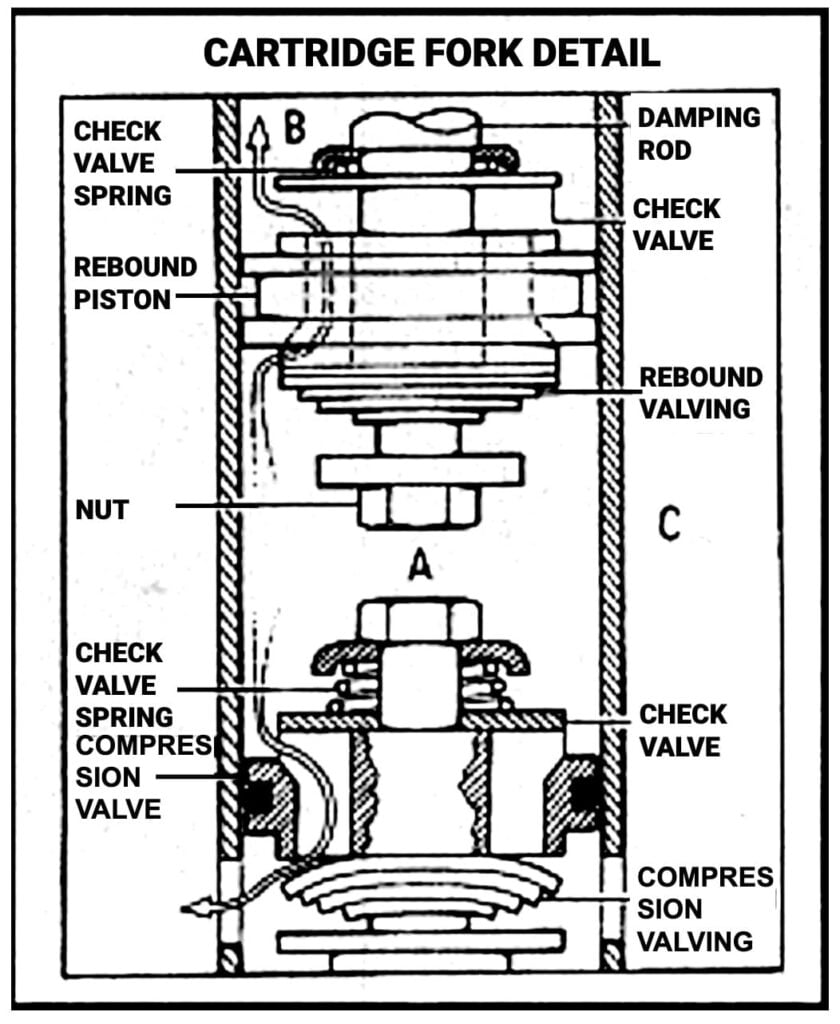
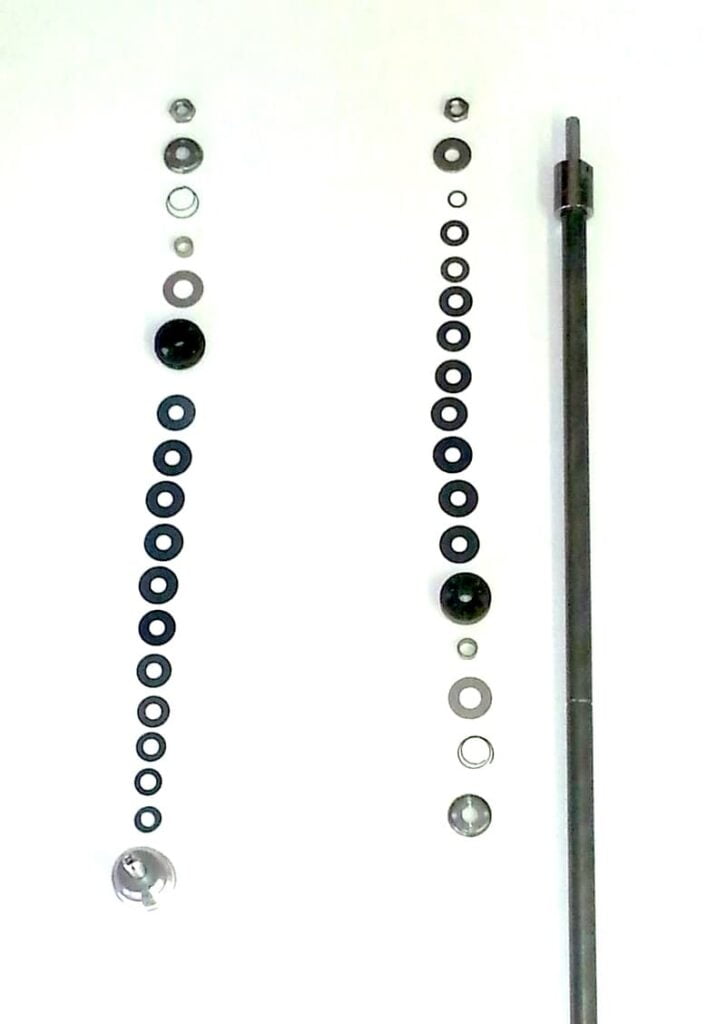
In the photo above, you can see a photo of a compression piston on the left of the photo and the rebound piston on the right. Each piston starts with a compression holder, then a stack of shims shaped like a Christmas tree, ending with a washer, collar, spring, and cap to finish off the valve, and a nut to hold it all together.
The rebound piston is the opposite of the compression piston, because the oil flows the other way. They’re not identical because rebound and compression damping aren’t tuned exactly the same.
The effect of the cartridge is to both a) make rebound and compression damping more linear, and to b) separate damping for rebound and compression, so a suspension tuner can both reduce diving under braking while increasing comfort over harsh bumps. The best of both worlds!
On each side, you can fine-tune compression and rebound damping in two main ways:
- Change the number of shims, or replace them with shims of different thickness and diameter.
- Adjust the damping by turning a screw that tightens or loosens the spring.
Gold valve emulators/cartridge emulators
Anyone who doesn’t have cartridge forks is probably now googling “How can I get cartridge forks?” and that’s certainly one way of solving the problem.
But another more common way of making damping rod forks work like cartridge forks is through an emulator. These are known as “cartridge emulators“, “gold valve emulators”, or just “gold valves”. They’re often made by Race Tech, a company well-known for them. I’ve seen some alternatives out there, but Race Tech is a big name in the business, and their emulators aren’t expensive (e.g. ~$150 in USD for an SV650).
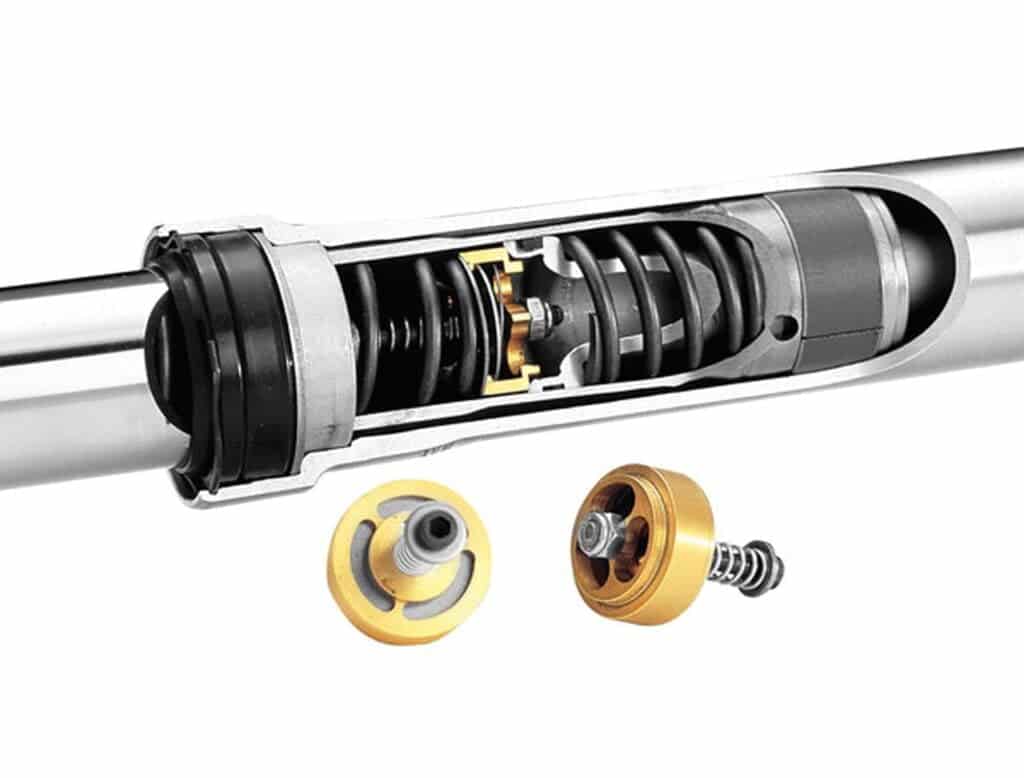
An emulator is a device you put inside the motorcycle forks to give you better control over compression damping. You still can’t control rebound damping (as you can in a cartridge), but you can control that with oil viscosity at least without dramatically affecting the compression damping too.
The emulator cartridge sits on top of the damping rod and is held in place with the main spring. You install it by taking apart the fork and enlarging the compression holes, which would basically make compression damping very low and allow the emulator to take over.
At low-speed compression (braking), oil bleeds through the low-speed bleed holes in the valve piston. There isn’t enough pressure to open the main valve piston.
At high-speed compression (big bumps, or maybe jumps), oil pressure lifts the emulator piston off its seat, allowing oil to flow more easily. This takes the edge off harshness when going over bumps.
So why get an emulator instead of cartridge motorcycle forks? Because an emulator is cheaper and is a vast improvement over stock. It provides just enough adjustability to overcome the major weakness of forks, costs US$150 for the parts (vs $800 for new cartridge-style forks, or a lot of hunting around in used parts forums), plus labour of course. And for many — including many track day casuals using otherwise low-end machines — an emulator works plenty well.
Why change motorcycle fork oil?
There are two reasons you should change motorcycle fork oil:
- Because it goes bad over time/after use and doesn’t do its job like it used to
- You want to change damping effect
The first reason is probably the best one in many instances unless you really know what you’re doing. Over time, fork oil:
- Generally deteriorates — being squeezed through a hole many thousands of times is really hard on oil. It just deteriorates. Energy going into anything slowly degrades it.
- Absorbs air — in damping rod forks (with many in use today, even in new motorcycles), there is air as well as oil in the fork. Mixing air with the oil causes the oil to degenerate.
- Absorbs other muck — The fork is a moving mechanism, and all moving mechanisms shed a little bit of waste in movement as things wear. And fork seals are good (unless they break!), but they’re never a perfect seal. Some muck will seep in, get into the oil and cause it to wear.
The above three things all cause fork oil to lose its ability to dampen.
The second reason is that you might want to change the damping effect of the fork — usually, people want to go heavier. If you use a heavier oil, it’s harder for it to go through the damping holes (in a damping rod fork) or through the valves (in a cartridge fork or one equipped with an emulator).
Changing to a heavier-weight oil isn’t a light decision to take. You should be aware that your suspension works as a system, and you’re going to have to adjust compression damping and rebound damping afterwards. If you don’t have that adjustability — say if you have non-adjustable simple damping rod forks — a heavier weight oil might make your ride unpleasant.
What happens if you don’t change fork oil?
Old fork oil can’t dampen the spring of a motorcycle as effectively.
You could experience this in a number of ways:
- The motorcycle’s front end is “bouncy” when you go over bumps. It might even be squeaky.
- Adjusting the damping has no effect (if your forks have adjustable damping).
- Contaminated fork oil can break your fork seals, causing leaking oil.
Broken fork seals start a vicious cycle because more contaminants will get in and make the oil worse and the oil will seep out (meaning less oil = even less damping). If you have upside-down forks, then your oil will leak out more quickly.
Fork oil starts out clear and can last that way for years. When you change old fork oil, it looks dark and gross. That’s a good visual indication that it’s time for a change.
What is the best fork oil to use?
Check your manual for your fork oil. It varies between motorcycles. You have to know a) what fork oil to use and b) how much to use.
For example, the recommended viscosities for fork oil for motorcycles in my garage at various points in the last few years have been 5W, 7.5W, and 10W. Asking around on owner forums, people recommend various other brands and weights, even suggesting that one oil of one brand of one viscosity may not perform the same as another oil with the same indicated viscosity. It does your head in!
There’s no easy answer to this, but the consensus among motorcycle suspension tuners is that changing the fork oil (if it’s still good) is nowhere near as important as an upgrade in fork technology such as upgrading to a cartridge emulator, to full cartridge forks, or to other fork setups.
How often should you change fork oil?
General consensus is that you should change the fork oil after a certain time or distance interval.
The recommended service interval for fork oil depends on the motorcycle. Different manufacturers have different things.
For example, here are the recommended fork oil replacement intervals for a few motorcycles from different brands:
| Motorcycle (Type) | Distance interval | Time interval |
|---|---|---|
| Ducati 1098S (Superbike) | 36,000 km (24,000 mi) | 36 months |
| Triumph Street Scrambler | 64,000 mi (40,000 km) | None |
| BMW S1000R, F900XR | 30,000 km (18,000 mi) | None |
For many Japanese motorcycles, the manual recommends only a) inspecting the suspension every X,000 km (e.g. 12,000), and then b) taking action if it’s necessary. So they leave it up to the mechanic.
This means that the mechanic (or competent home mechanic) would judge whether the suspension wasn’t behaving properly or leaking and then take action.
If you ask forum members how often they change their fork oil, you’ll get varied responses from “never” to “religiously, every 2 years or 15,000 miles” (at probably the more extreme end). More often if it’s a dirt bike.
Here’s what the distilled wisdom of motorcycle manuals and the internet seems to be:
- Change the fork oil every 30-40,000 km.
- Check your motorcycle forks for correct operation every year. If it’s not performing to spec (bottoming out or riding harsh), then replace the oil (along with doing whatever else you do to fix it).
- If there’s a leak, change it right away along with replacing the seal.
As to whether you should change your fork oil every certain number of years — you don’t have to. But next time you have the front wheel off (to change the front tyre), if it has been more than five years, I would go the extra mile to change the fork oil too.
How do you change the fork oil and fork seals?
Every motorcycle varies in how it’s put together. But generally, the process for changing the fork oil and seals is like this:
- Loosen the brake calipers, top of the forks, and the clip-ons (if you have them)
- Remove the forks — removing the brakes (hanging them with wire), wheel, and front fairing, then jacking it up on a triple tree stand, then undoing the bolts on the triple tree
- Disassemble the forks — remove the dust cap, the retainer clip, undo the bolts holding it together, and then pull it apart to remove the fork seal
- Pour out the oil and dispose of it safely
- Clean it all out with brake cleaner
- Re-assemble the fork, putting things back in in the order in which you removed them, using the new fork seals (and other components)
- Put new fork oil in, the recommended spec, measuring the level
- Re-seat the seal using either the old seal, PVC pipe, or a custom tool
- Put the forks back on, forgetting no random bits!
- Re-install the wheel, axle, and brakes, and torque everything back to spec
- Re-install the clip-ons if you took them off
In general, changing the fork oil and seals is a 3-4 hour job for an amateur. That’s not including time taken to refinish the fork legs, if that’s necessary.
What causes fork seals to fail?
This is something I discovered when changing my own fork oil and seals. Fork seals fail for any number of reasons, but primarily it’s breakdown of the seal between the fork inner (the tube) and the fork seal.
The breakdown can occur for any number of reasons, including
- Dirt and contamination — This is the most common reason. No seal is perfect, otherwise the fork tube wouldn’t move. Over time, contamination wears away at the seal, and eventually, it starts to fail.
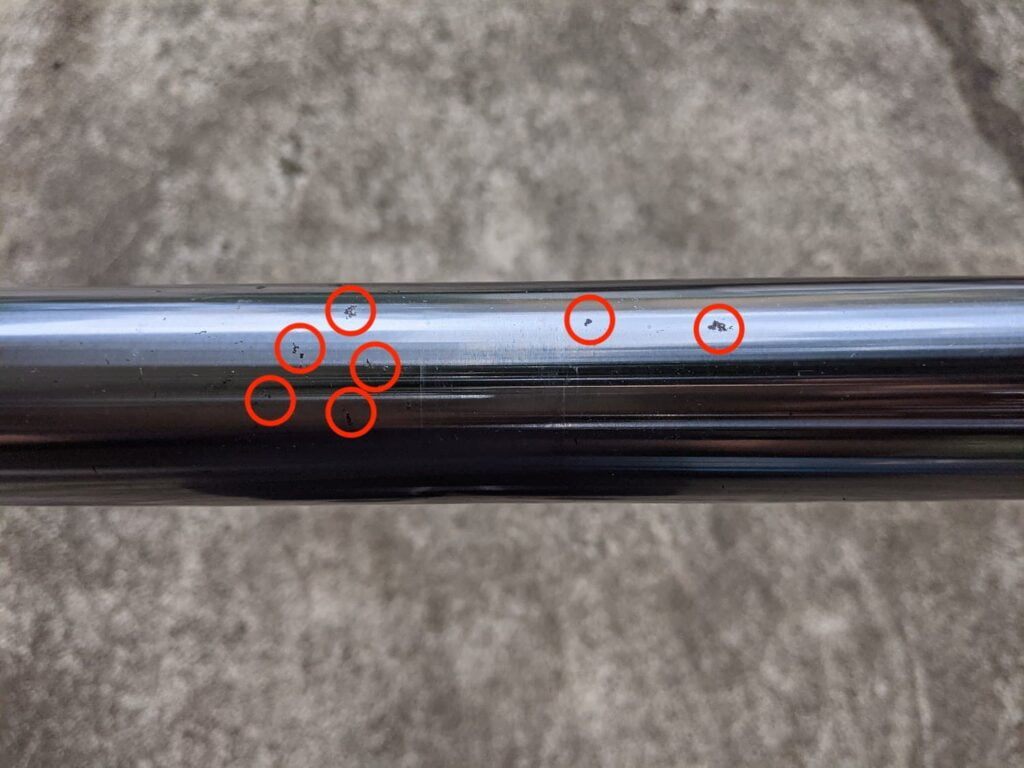
- Rust/pitting of the forks, which may occur over time, and might be accelerated by having been impacted by debris.
- Wear of the fork inners by scratching (e.g. being hit by rocks) even if there’s no rust. This is often fine, but if the scratch is in a place that is near the seal, it can bounce against it hundreds or thousands of times and eventually, wear it just enough for oil to start weeping out.
Unless a motorcycle is never ridden and very carefully stored, the fork seals are very likely to fail. And if a motorcycle is ridden, then one (or all) of the above will definitely occur.
In the photo below, you can see pitting on fork inners from a motorcycle that sat for long periods of its ~20 year lifespan.
Once a fork seal fails, it begins a vicious cycle: more contaminants start to go in, and the fork starts to perform more poorly as it has less fluid and the remaining fluid is contaminated.
There are some intermediate stop-gap fixes for failed fork seals, but the only long-term solution is to replace the fork seal, address any issues with the fork inner tube, and replace the fork fluid while you’re at it of course.
How do you fix damaged motorcycle forks?
There are a few different ways you can fix damaged motorcycle forks, whether the damage has been from pitting or from scratch damage from lots of small rocks.
First, you have to sand back the pitted or scratched area. You do this by
- Lubricating the area with WD-40 or oil (doesn’t matter which)
- Sanding it in a criss-cross pattern (neither along the shaft, nor purely horizontally), with a kitchen scouring pad, or 600 grit then 1200 grit wet-and-dry sandpaper
Best practices:
- For light scratches or pitting, you don’t even need sandpaper. Try to get by with a kitchen scouring pad. You can also try using a rolled up ball of aluminium foil. (This didn’t work for me, though.)
- Avoid steel wool. I’ve known many enthusiasts to do it. But for a first-timer, the risk of a shard of steel wool getting lost in there is significant, and an unnecessary risk to take.
- Don’t sand along the shaft of the tube. You’ll cause vertical indentation that might help oil leak out.
- Use a sanding block as you sand criss-cross so that you don’t sand contours into the metal.
Secondly, if the pitting is severe and causes indents, you have to smooth out the surface. I’ve seen some “hacks” where people fill pits with superglue or JB Weld, then let it harden, cut it flat, and sand again. Repeat, until the fork is smooth. This hack can actually last a long time.
The ideal solution, though, is to get your forks professionally rechromed. There are professional outfitters in many major cities who are experts at getting motorcycle forks. They’ll straighten them, remove pitting, and re-cover them in chrome until they’re as good as new. I got a quote for my forks and it was US$150 per fork tube.
The other thing you can do is to buy fork tubes online. In the end, this was the cheapest option for me, probably because I ride a Japanese sport bike with many available parts (thank goodness).
For peace of mind, I’d always re-chrome fork tubes or buy them online. For a cheap and cheerful job (e.g. on a budget, or for an unimportant motorcycle), sanding will go most of the way.
What do you need to change fork oil?
Before starting your fork oil change, there are some tools and consumables you should get.
Consumables you need to change the fork oil
You should get
- Fork seals for your motorcycle (get the OEM ones — they’re usually cheap, even for European motorcycles)
- New fork oil (find out what spec fork oil you need, as well as how much)
- Torque specs — make sure you know them before you put it back together
- Optional — other replaceable parts of forks items, like shims, circlips, etc. You don’t have to change these, but you might as well if your bike has done a lot.
And if you want to upgrade your springs and valves, now is the time to do it!
On most motorcycles destined mostly for street use, there’s not much point in upgrading the suspension.
But if you push your motorcycle really hard, or if you plan on using it at the track, now is the time to upgrade to better
- Valves — This is usually the biggest improvement you can make to front suspension. Upgrades to cartridges or gold valves are common if you have basic damping rod forks.
- Springs — If you’re really heavy (or light), or if your bike is very experienced (> 100,000 km of riding… not just age), your springs might need a refresh.
Even if your valves and springs are fine, if you’re changing the purpose of your motorcycle (e.g. rebuilding it for the track), springs and cartridges from an advanced vendor (like Öhlins) are a good idea.
What tools do you need to change fork oil?
The first tool you need is a way of supporting the fork of the motorcycle (you can’t lift the front wheel with a paddock stand… you need to remove it!)
- Front head lift stand — to lift the front of the motorcycle. There are a number of other ways of lifting the front, like using a tie-down fastener under the triple tree and secured to the roof or a ladder.
- Paddock stand or something to hold the rear wheel in place
- Fork seal driver for your fork size — e.g. 43mm for my CBR600F. (You can also use the old fork seal and a block of wood to drive it in place, or you can use a PVC pipe of the right diameter)
- Syringe with fork oil level gauge
You will also need some standard tools
- Wrenches — metric if you have a metric bike
- Allen keys — metric or imperial
- A rubber mallet — sometimes, something needs whacking…
- A small screwdriver to lift up the boot and remove clips
- A few big sockets or wrenches — e.g. to undo the top of the fork seals and the axle (I needed a 22mm and a 24mm, for example)
How hard is it to change your own fork oil and fork seals?
In general, I’d say working on motorcycle forks is of moderate complexity for anyone used to having bits of their motorcycles in pieces.
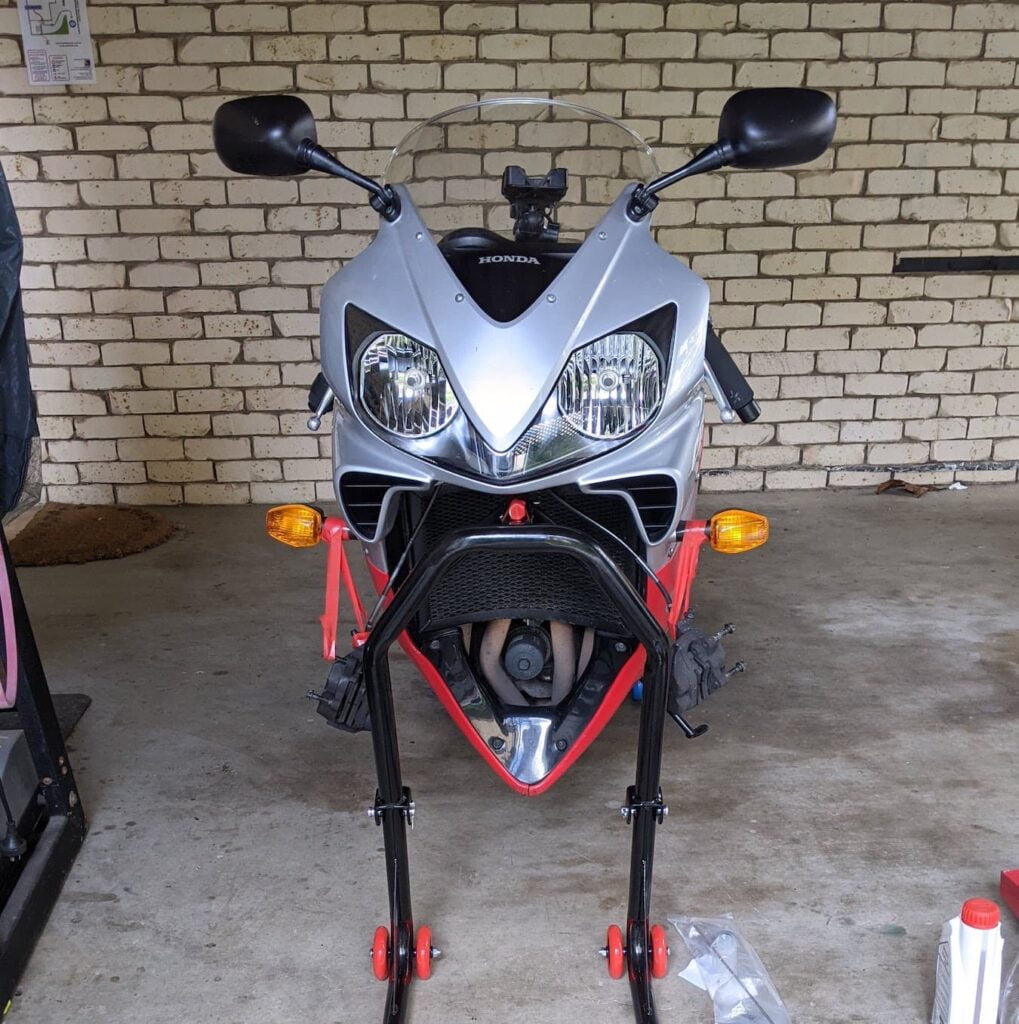
If the following things don’t scare you
- Using a torque wrench
- Doing incremental testing to make sure things are right
- Following a shop manual
- Taking notes
- Cleaning grease off parts with degreasing spray
- Using rubber gloves
Then I think changing fork oil and seals is within your grasp!
The first time I did it, I was worried just about taking the forks off for repair. That was the easy part. The hardest part, I found, was cleaning the fork tube of its pitting. I took it to a mechanic to check my work… and he told me I may as well get new tubes. So I had to leave my motorcycle on those stands for a few days.
Finally, re-assembling needs care as you have to make sure
- You put everything back in the right order
- You put in the right amount of fork oil (and that it’s even between the fork legs)
- You install everything correctly
- You torque everything back to its correct specs
It’s quite a lot to pay attention to. But totally doable, if you’re careful.
Other questions?
I’ve tried to answer all the questions I’ve had — and I suspect you have the same ones. But if there’s anything else you’re unclear about, drop a comment or contact me and I’ll look into it.



My boyfriend is so excited to purchase his first motorcycle now that he has his driver’s license. Thanks for mentioning that some fork seals fail because of usage which eventually causes them to be pitted. He should consider more issues like these so he could have it repaired or even avoided in the future.
My bikes fork oil capacity is specified at 433cm³ and the distance from the top of the inner tube to the oil is specified at 106mm when I added the 433ml of oil it was not within the specified 106mm why is that ?( I added more oil till it was 106mm from top to oil )
What’s the trick to working on motorcycle with lots of chrome on it While rebuilding the forks we had to measure space on each side of wheel. This was not easy just because the reflection of light from the chrome. You guys must know trick to working with chrome?
It’s not my area of expertise, but leaving this comment in case others want to chime in!